Hello grade 4s and families.
We are headed into our final week of the school year. We have some fun celebrations ahead!
I have added a couple of optional literacy tasks for next week (under the Literacy section) in Google Classroom. They include a Reflection of the year, and a Goal Setting option. This work is an option if you are finished your Passion Project (due Tuesday) and your Flipgrid video, and are looking for more. The math tasks posted last week are also an option if you have not yet tacked those.
We had a great meeting today! We have decided that next week will be as follows:
Monday 10:30 optional Meet to address questions on your projects and say hello
Thursday 11:00 am - our final class Meet! We will look at the Flipgrid videos together and will share a few of the Passion Projects (email me if you would like to volunteer! so far we have Thomas and Rishitha to share.
Friday 11:00 am - Grade 4 Celebration Meet (all grade 4s - NOTE the different Meet Code) - invite sent to your families and attached in our Classroom Stream. Dress up if you wish! And bring your families :)
Friday 11:30 am - Room 3 'open house' farewell (regular Meet code). Pop in to chat and say farewell to our class, with your families if you like.
Report cards will be made available online on Friday. Your belongings can be picked up next week - information will be sent to your parents on times to come by.
'See' you next week!
~Ms. Brandley
Friday, June 19, 2020
Sunday, June 7, 2020
Learning Plan June 8-12
I hope you have a great week ahead grade 4s and families!
I look forward to seeing you in our meetings this week:
Monday at 10:30 (optional) review of this week's tasks
Friday at 10:30 - we will be talking about RT Alderman and our year end celebration.
Learning Plan:
Math Focus
Monday/Tuesday
I can measure the area using square centimetres.
I can measure the area using square metres.
Now that you have had the opportunity to determine a referent for measuring cm2 and m2 and practice estimating area, it is now time to calculate the actual area of a given set of regular and irregular shapes.
Area is measured using square units. That means when you want to calculate the area you can count the squares.
Task 1:
To find the area of a rectangle (array), simply count the number of cm squares inside the rectangle. The area of the shape below is 5 x 3 = 15 square centimetres.
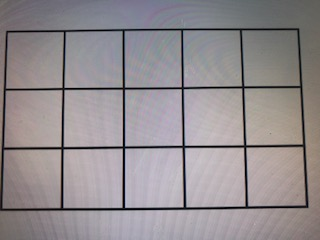
Work out the area of the following arrays. Please include the multiplication equation along with your final solution:
1. 2.

Area = __________ square cm Area = ________square cm
3. 4.


Area = _________square cm Area = _________square cm
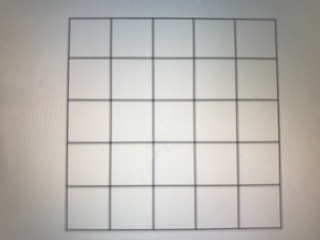
Task 2:
Determine the length (row) and width (column), in square units, of the following shapes in order to calculate the area in square units.
Length = the row of squares that run from left to right
Width = the column of squares that run from top to bottom


Task 3:
Not only is it important to know how to determine the area of regular shapes but also irregular shapes, such as the letter ‘T’ below.
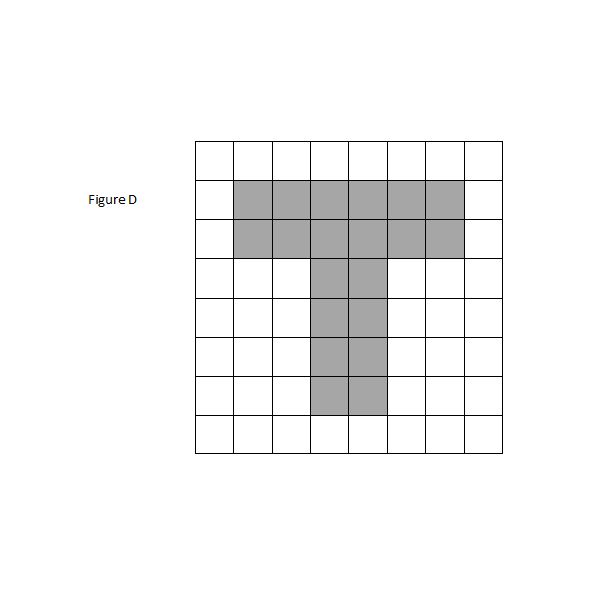
1. Count the number of “unit squares” shaded in Figure D _________
2. How many “unit squares” are shaded in Figure D? __________
3. What is the area, in square centimeters, of Figure D? __________
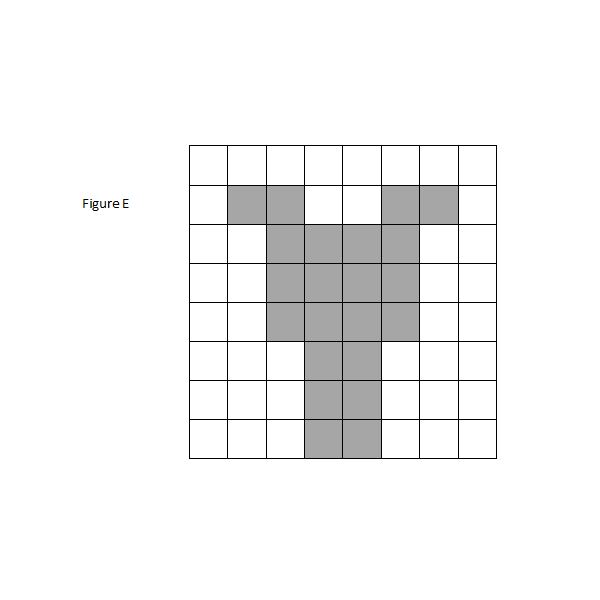
1. Count the number of “unit squares” shaded in Figure E ________
2. How many “unit squares” are shaded in Figure E? _________
3. What is the area, in square centimeters, of Figure E? _________
Wednesday/Thursday
I can explain the strategy used to determine the area of regular and irregular shapes.
I can create different rectangles for a given area.
I can show that many different rectangles may have the same area.
The dots below represent pegs on a geoboard. When you have 4 dots in a square shape, you have one square unit.

Think about it: Can you figure out the area of this shape?
How many square units have been used here?
How do you know?
On a real geoboard we can show shapes using elastic bands. Using the images below, explain how you know the area listed for the images is correct. Choose at least 3.
A. B. C. D.

E. F. G. H.
Task: Using grid paper or the online geoboard complete one of the following.
Choice 1: Make as many shapes as you can on the grid with an area of 12 square units. The corners of the shapes must be dots on the grid.
Choice 2: Make as many rectangles as you can on the grid with an area of 12 square units. The corners of the rectangles must be dots on the grid.
Once you are finished answer these questions:
- How did you find your first shape? (ie. what did you do to help you draw the first shape)
- How did you use that first shape to help you get other shapes?
- How do you know that your shapes each have an area of 12 square units?
Friday
I can estimate the area using square centimetres of regular and irregular shapes.
I can calculate the area using square centimetres of regular and irregular shapes.
Today you will be incorporating your knowledge of Light and Shadow in your calculations of area. This is an opportunity for you to get outside and enjoy the sunshine (hopefully!). If the weather is uncooperative, stay inside and use a flashlight to complete the task.
Task 1:
The size of a shadow depends on the size of the object AND the position of the light shining on the object. In this task, you will select items in your house that are examples of a regular AND irregular polygon (review the images on Monday/Tuesday) and create a shadow. Please select 2 regular shapes and 2 irregular shapes. When you are satisfied with the shadow you have created, calculate the area (square centimetres OR metre squared) using a personal referent that you brainstormed last week. You could also measure the length and the width to determine your objects area.
For each shadow shape, please include the following:
- ESTIMATE the area.
- CALCULATE the area (show your work!)
- PROVIDE a photo or sketch of your shadow shape.
Task 2:
In this task, you will be given a specific area that you will then need to create a shadow that represents that area.
- 24cm2
- 9cm2
- 40cm2
- 18cm2
Literacy Focus
Monday and Tuesday
Light and Colour - Creating a Rainbow
✓ I can find information to answer research questions in a variety of ways.
✓ I can use subject-specific vocabulary (science words) in my writing.
✓ I can recognize that light can be broken into colours.
Task 1: Experiment
Instructions:
Make a rainbow like the ones you see in the sky using materials you probably have on hand.
Here’s what you need:

- clear glass of water
- a piece of white paper
- masking tape
- flashlight
Steps:
1. Cover the flashlight with two pieces of tape leaving a slit in the middle.
2. Shine the flashlight through the glass of water onto the piece of paper.
3. The rainbow should appear on the paper. {Turn off the light to see it better.}
4. You may need to sit the glass on top of a can or jar of peanut butter {in my case} to raise the glass up higher.
5. Play with the angle of light shining through the glass until you get a good rainbow. For me, shining the light near the top of the glass {by the rim} worked the best.


Results:
Draw a picture or take a photo of what you observed and label it. If you were unable to complete the experiment, you can use the images above to see what it should have looked like. Be sure to:
- label the colours that you saw
- label the path that the light took from the flashlight to the rainbow
- include a short description (1-2 sentences) of your hypothesis (what you THINK is happening) based on what you know about how light travels.
Task 2: The Science of Rainbows
Now that you have had a chance to experiment with creating a rainbow, let’s learn some of the science behind this cool phenomenon!
Here are two resources for you to read and learn the science behind rainbows. There is more information here than what you will need, so be sure to focus on the relevant information! (hint: look for a diagram of a rainbow)
Review these resources with this question in mind: How does a rainbow form from white light?
Article: What is Light?
Reference Sheet: Light and Colour
Return to the “Results” you recorded from your “Rainbow Experiment”. Add a reflection that explains the science behind what you observed. Use at least 3-5 science words from the attached “Science Words” document.
Choose 1 of these formats to write your reflection:
- Add labels to your Results diagram from Task 1
- Create another labelled diagram
- Write a paragraph (5-8 sentences)
Thursday
Learning Intentions
- I can communicate ideas and information in a variety of ways
Today you will create your own pictograph. You will need to think of an event or idea that you want to communicate to other people. It could be something you would like them to know about you and/or your family. It could also be an important event or experience you would like to share. Imagine people reading this 100 years from now. What would you like them to know about you?
Task 1
Look at the example below of the picture symbols that may have been used by First Nations Peoples.
Task 2
Take a look at my example of my pictograph. Notice that there is a legend so that the reader is clear about what I am communicating. I then write in words explaining my pictograph.
What is my story?
👨👩👧👦 ❤ 👀 🦅 🔭 🌳

🐣🐣
Legend
👨👩👧👦=family
❤=love
👀=watch
🦅=eagles
🔭=telescope
🌳=tree
🐣🐣=eaglets
My pictograph tells how my family loves to watch the eagles from our telescope. They live in a tree and they have had 2 eaglets.
Task 3
- Create your own pictograph. Think of an event or idea you want to communicate.
- Decide on the pictures or symbols that will represent the main words (you do not have to use pictures for the little words like: a, the, it, to, in………)
- Choose how you’ll create your pictograph (draw, paint, sidewalk chalk, lego, plasticine, *see the optional note.)
- Make a legend to show what your pictures represent.
- Write about your pictograph.
Optional: To make your pictograph look old you could draw it on a brown paper bag or take a wet tea bag and smear it onto white paper. Then crumple it up to make it look aged.
Friday
Let’s have some fun today. Write a letter or a paragraph to share with your teacher your thoughts on:
What is something that you would NOT want to be allergic to? Why?
You can choose anything you like, but here is a fun little video for some inspiration. (Who doesn’t love cute cat videos on a Friday?)
Extensions: (Optional and Not Assessed) section
Interesting Article: Why isn’t the sky orange?
Article: Why isn't the sky orange?
- Read the attached article and explain how the sky used to be orange and now it appears blue. What changed?
- If the Earth no longer had any trees or plants, do you think the colour of the sky would change? What else might be affected? Use evidence from the article to support your argument.
Friday, May 29, 2020
Learning Plan June 1-5
Welcome to Week 10 of learning from home! I hope you are all well and spending lots of time outside in the beautiful sunshine.
Next week is a short week, as Friday is a non-instructional day. If you are looking for more to do, check out some of the cool online resources in the iLab Classroom or try out the Science Extensions for the week.
Please note the change to the class meeting schedule for next week. This is only for next week, and we will resume our usual Monday/Friday schedule the following week.
Happy learning! And as always, email me with any questions.
Class Meetings:
Monday 10:30 (optional) review of tasks for the week
Wednesday 10:30 - class meeting
Math Focus
Monday
I can demonstrate an understanding of area or regular and irregular shapes.
I can recognize that area is measured in square units.
Warm-up: Get your brain ready! Think about this problem. What would you do? Share your ideas below.
What I would do:
What we already know…
In grade 3 you learned about perimeter.
Perimeter: the distance around a closed figure (ie. the length of fence around a yard)


When we look at a closed shape, we can measure the perimeter (total length of outside edges). We can also measure the area.
Area: the amount of space inside the boundary of a flat (2 dimensional) object (ie. amount of carpet on a floor or grass in the yard)


Area is measured using square units. That means when you want to calculate the area you can count the squares.


When measuring area we use exact measurements. In grade 4 we will be using centimeters (cm) or meters (m) to measure.
Task: Look around your home to find items you can use to measure using centimeters and meters. It may be one object or many. Record the name of it and how you know it will help you measure cm and m. You may also include a photo of it if you like.
My measurement tools:
Tuesday
I can select and justify referents for the units cm2 or m2.
Using the measurement tool(s) you found yesterday, take a close look at the cm measurement.
What do you notice?
If you had to describe it to someone else, what would you compare it to?
The object you compare it to should be close to the same size. This is called a centimeter referent. One natural referent for a cm is the width of a finger.
Using the measurement tool(s) you found yesterday, take a close look at the m measurement.
What do you notice?
If you had to describe it to someone else, what would you compare it to?
The object you compare it to should be close to the same size. This is called a meter referent. One natural referent for a m is the height from the floor to a doorknob.
Now it’s your turn! Search around your home for other personal referents for cm and m. How many can you find? Your goal is to find at least 3 referents for each measurement. Good luck!
My Referents
Wednesday
I can select appropriate referents for the units cm2 or m2.
I can use a referent to estimate the area of a 2D object.
Now that you have brainstormed various items located in your household as a referent, lets now put those selected items to good use. Using a referent from your brainstormed list, estimate the area of the objects below.
***Think about which unit of measure (cm2 or m2) would be appropriate for each of the objects.
Thursday
I can compare the areas of various sized squares and/or rectangles.
Now that you have had the week to learn more about estimating and calculating different areas, let’s apply these skills to a game.
You will need:
*2 dice
*grid paper (1cm by 1 cm)
*pencil crayons
How to play:
Step 1: The first player rolls 2 dice. The product of the 2 numbers is the area of a rectangle.
Step 2: The player colours the rectangle on grid paper.
Step 3: The next player rolls 2 dice and colours another rectangle on the same grid. If there is no space left to colour the rectangle, the player loses the turn.
Step 4: Continue taking turns until no player can go. Count the coloured squares to see which player has coloured the greatest area.
For example: If I roll a 2 and a 4. That’s an area of 8 squares. I can colour a 2 by 4 or a 1 by 8 rectangle.
Literacy Focus
Monday and Tuesday
Bill Nye: Optics (continued)
✓ I can make an inference based on what I observe.
✓ I can answer questions using a variety of sources such as articles and videos.
✓ I can recognize that light can be reflected and refracted (bent).
Answer the following questions from the attached video. You may want to review some of the scientific terms used in previous weeks to help you out.
Day 1
- For the following, choose from this bank of words. You will not need to use all of the words. Choose the best to complete each sentence based on what you have learned about light.
- The way a lens is ________ affects how it ________ light.
- Concave lenses make things look ____________.
- Convex lenses make things look __________.
- Draw a diagram to demonstrate your understanding of the following scientific words as they relate to light. Rewatch the sections of the video where these terms are explained and be sure to use your own words in the labels.
- Concave lens:
- Convex lens:
Day 2
- Draw a diagram (or take a photo) and describe an example of a material (from the video or from your home) that gives you a:
- A plane mirror / straight reflection:
- Convex mirror / reflection:
- Concave mirror / reflection:
- OPTIONAL (not assessed) EXTENSION: Choose 1 of the real world applications of light refraction/reflection and describe how it works using the scientific vocabulary you have learned:
Include at least 2 of these scientific words that apply to the example and show your understanding of their meaning by using them appropriately. You can use a paragraph or a diagram to describe it.
- Greenhouse windows
- Car mirrors
- Remote control
- Reading glasses
- Binoculars
- Telescope
- Sunglasses
Wednesday
Learning Intentions:
- I can identify the main events in what I read, hear and see
- I can make notes of key words, phrases and images
- I can record information that are on topic
Write a reflection about oral storytelling. Use these questions to guide your thinking. (How do you enjoy a story? Why is storytelling important to First Nations Peoples? What is the purpose of storytelling in First Nations Culture?)
Last week you read the story “Okatak” that told a legend of how Big Rock formed in Okotoks. This week you will learn about how storytelling through oral traditions are important to First Nations Culture. You will be watching a video and reading information. Decide how you are going to take notes. You can make a web or write jot notes (key words or phrases.) Your title will be “How do we Know about First Nations?”
Tasks
- Read information from the link below “How do we know about First Nations?”
- Make a web or write jot notes as you read and listen to the information
- Write a reflection about oral storytelling. Use these questions to guide your thinking. (How do you enjoy a story? Why is storytelling important to First Nations Peoples? What is the purpose of storytelling in First Nations Culture?)
Thursday
Learning Intention:
- I can use talk, notes and personal writing to reflect on my ideas and experiences
Tasks:
- Watch the video “Writing on Stone” You may stop at 3:00 minutes. (You will be watching the rest of the video next week.) You may add any new information to your web or jot notes from yesterday.
- Write a reflection about oral storytelling. Use these questions to guide your thinking.
- How do you enjoy a story?
- Why is storytelling important to First Nations Peoples?
- What is the purpose of storytelling in First Nations Culture?
- If you were asked to tell a story about an important event what would it be about?)
*Remember to use complete sentences.
Video “Writing-on-Stone” (stop at 3:00 minutes)
Extensions: (Optional and Not Assessed) section
Science: Some fun with Optical Illusions
Have some fun with looking at these optical illusions and see if you can figure out what is going on!
What is an Optical Illusion? (From website)
Optical Illusions can use color, light and patterns to create images that can be deceptive or misleading to our brains. The information gathered by the eye is processed by the brain, creating a perception that in reality, does not match the true image. Perception refers to the interpretation of what we take in through our eyes. Optical illusions occur because our brain is trying to interpret what we see and make sense of the world around us. Optical illusions simply trick our brains into seeing things which may or may not be real.
Try out some of these illusions and discover just how tricky it can be for your brain to accurately interpret the images from your eyes.
Your task: Can you see any connections with these illusions and what you have learned about Light and Shadow? Consider the transparency, reflection, refraction, the light and the shadows.
Subscribe to:
Posts (Atom)
-
 Highlights: - We went for a hunt for ladybugs (ZG) - We had gym and we played "Clean your Room" (PS) - Today when ladynbug coll...
 -
Highlights: - We went to the Community Garden today in Maple Ridge (SF) - We talked about what plants need after (SF) - Today we saw wate...
-
As we enter into week 6 of online learning, we have been hearing from some families that they are overwhelmed. Know that our goal is to ke...
